|
|
Post by Chris on Dec 11, 2013 18:54:45 GMT -8
My recent picture of the Hawk Owl didn't turn out as I would have liked. What would be a few ways to improve the picture? Do I need to change the ISO? The background is white which causes trouble I think. 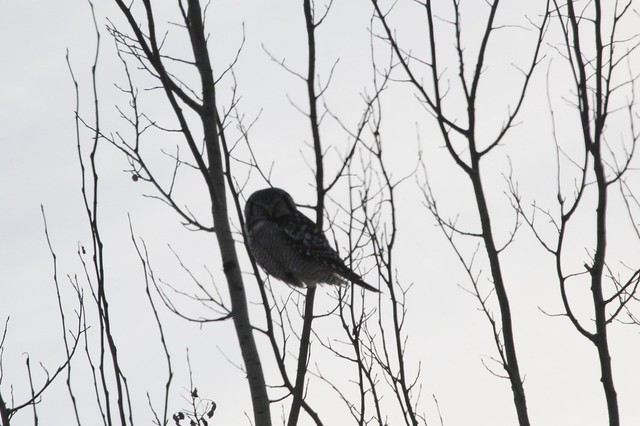 |
|
|
|
Post by oldfulica on Dec 11, 2013 20:02:25 GMT -8
Hi Chris
If your camera has exposure compensation you have to increase it when the subject is backlit. In this case +3, or so, would have lightened up the owl. Looks like you are finding some nice stuff up there.
|
|
|
|
Post by theanimal on Dec 11, 2013 21:32:13 GMT -8
Chris, if you have Photoshop or Photoshop Elements, there's a quick correction that you can use to help bring out the image a little brighter. Unfortunately, you will lose definition in the background (your sky will go white and yes, it is better to do your +3EV in camera. But this is a quick fix that I found for photos that just aren't quite up to snuff.
1. New Fill Layer Solid Color (White)
2. Go to the drop down box in the toolbox that says "Normal" switch that to "Soft Light" - You'll see your owl shot (it'll look kind of faded) and that will lighten the photo and bring out the detail in the feathers instead of having the owl look like a dark shadow. You'll find it looks really light.
3. Select Background image on "Layers"
4. Go to ENHANCE LIGHTING > ADJUST > LEVELS and play with the sliders until you get vivid detail (not washed out on the owl). Save image.
|
|
|
|
Post by Chris on Dec 12, 2013 18:43:14 GMT -8
Thanks Len and Hugo for the suggestions. I forgot about changing it to +3. I have done that in the past but I rarely change my settings except for ISO.
Hugo, unfortunately I don't have any photo editing software but it is great information to know.
|
|
|
|
Post by Gord on Dec 12, 2013 23:10:07 GMT -8
Chris, another way to 'fix' this is to switch to manual and take an exposure reading off of something the same tone and in the same light as your subject (a patch of trees, the ground etc). Then, using the same exposure setting you got from the trees/ground etc point your camera at the bird and take a picture. The exposure reading when you aim it at the bird will say you are over exposed (unless you are doing spot metering and the spot is on the bird) because the large area of bright sky is fooling your meter that is taking a reading from the entire area your lens is covering. The bird (that is the same tone and in the same light as the trees/ground etc) will be properly exposed when you do this.
|
|
|
|
Post by dpeppar on Dec 13, 2013 8:44:58 GMT -8
I do what Gord suggest and have been doing it that way for 3 years after spending a day with Ken....also some post processing will get a decent image....DaveP
|
|
|
|
Post by Randy on Dec 13, 2013 16:13:38 GMT -8
Hi Chris, if you don't have Photoshop you can also try Windows Live Photo Gallery (Windows 7 or newer versions of Windows). Then click "Edit, Organize, or Share" in the top left corner. Double-click on the image in question then click on "Adjust Exposure" on the right-hand side. Adjusting highlights and shadows won't make it perfect but I think will probably help. You can also do an auto-adjust for exposure, which is hit and miss.
Cool sighting!!!!
|
|
|
|
Post by Randy on Dec 13, 2013 16:18:32 GMT -8
Here's what I was able to do with my above suggestions (I put highlights basically all the way down and shadows almost all the way up. I also adjusted contrast and brightness a little bit). Not perfect but I think it looks a whole lot better! I also lost some resolution in saving the image you had uploaded instead of working with the original...  |
|
|
|
Post by Chris on Dec 13, 2013 18:00:14 GMT -8
Wow, thanks Randy. That made quite a bit of difference!
|
|
|
|
Post by kenpossum on Dec 14, 2013 1:53:53 GMT -8
|
|
|
|
Post by kenpossum on Dec 14, 2013 2:04:05 GMT -8
I played with your image a bit as well. Photoshop Elements 9. (I really recommend you getting a copy, as you will use it every day. Talk to Santa.)
1. Enhance
2. Adjust Lighting
3. Shadows and Highlights.
4. Contrast
I only lightened the shadows, and upped the contrast a touch.
The image is quite soft. Using a tripod?
I also recommend full manual settings over Aperture Priority Auto. Test on a back-lit subject and shoot away. No fiddling with the (+ -)compensation every time you move the camera about. That would drive me crazy! Test again for a well lit subject. Adjust the shutter speed and shoot again. Keep the two shutter speeds in your head (silhouette /back-lit and front-lit. Flip between the two as you find your birds in different light. Easy, quick, and no fiddling around with other settings.
|
|
|
|
Post by hank9 on Dec 21, 2013 17:37:45 GMT -8
I use Microsoft office picture manager and when I get my bird photo your stage with the bright white background I go to color and slide the amount to the left which will give you the blue background and the I adjust the hue and saturation to final edit and that makes the bird stand out more.
|
|


