
Post by kenpossum on Apr 3, 2011 16:17:29 GMT -8
Sharpness is key. If an image is not sharp it is often destined to the trash unless it is unique and can not be readily replaced. What follows is a summary of various techniques that photographers often use to create sharp images.
1. Tripod. There is no factor greater to achieving a sharp image in MOST situations than the use of a photographer friendly tripod. That means a tripod that has enough key features that makes it easy to use - ball head, reasonable weight, flexible legs, height etc. There are many instances where a tripod can not be used in bird photography, but whenever it can, the tripod often increases your ability to create a sharper image without resorting to flash or a high ISO.
2. Remote or electronic shutter. When my bird is not moving, I almost always use an electronic shutter as i am not comfortable with my hands touching the camera body when the image is being taken. I have noticed the difference.
3. Self-timer/ Mirror lock-up. If you don't have a remote or electronic shutter release, a self timer may do the trick. Set it to a two sec release and hope for the best. If your mirror does not lock-up when you use the self timer (You can tell by looking through your viewfinder during the process - the finder will go black), the mirror lock-up feature on your camera will do the trick.
4. Low ISO. Whenever you have to increase the ISO noise increases resulting in degraded image sharpness. Just as Kodachrome 25 was a best film for image sharpness, an ISO of 100 will result in the lowest noise level in your image. Not always possible with bird photography, especially if one chooses to hand hold, but the results speak for itself.
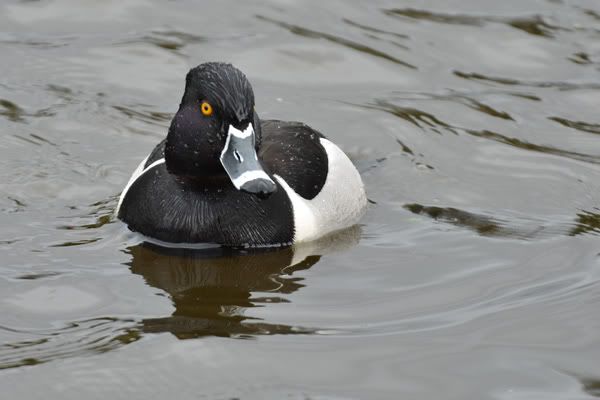
The Ring-necked Duck at Salish Park below was photographed at ISO 280. Not the lowest ISO but the best I could set given the light conditions at the time.
5, High shutter speed. The faster the shutter speed, the sharper your image will be. On a sunny day, I try for f/1000 or higher. Using a car blind, I try for 1/2000 or higher. Straight hand holding, I aim for 1/2000 - 1/4000.
6. Sunlight. In order to set your camera to a low ISO you need enough light to make that those settings possible. The lower the light due to time of day or cloud cover will adversely affect the sharpness of your photo.
7. Depth-of-field. DOF is the depth of clear focus in your image. It is determined entirely by your aperture setting. While f/2.8 lenses will enable you to shoot in lower light, an aperture of f/2.8 may result in some areas of your image being blurred. As you move towards f/22, your DOF or area of sharpness increases.
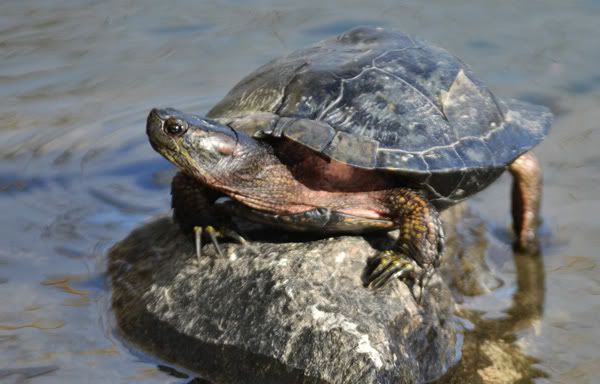
As an example, I photographed this turtle in Sardis Park yesterday at an aperture of f/5.6. Notice how out-of-focus the hind leg is.
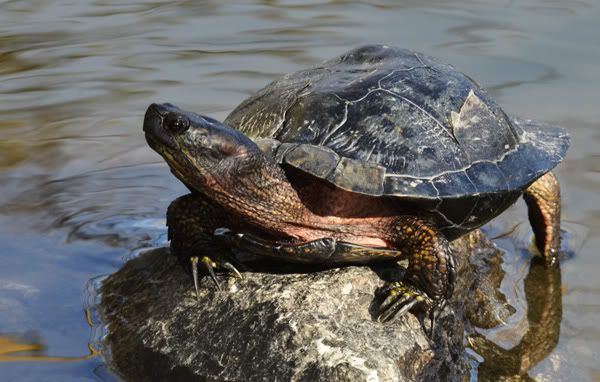
The image below was taken at f/11. Notice the results.
8. Sharpest Aperture. All lenses vary in sharpness depending upon the aperture used. The sharpest aperture tends not to be f/22 or f.2.8 but f/8-f/11.
9. Sharpest focal length. Similar to the above, many lenses go 'soft' at their extreme focal lengths. In photography, the axiom "You get what you pay for" is often true. Those $10,000 lenses have good glass and get great results. For those of use who can not afford the top dollar lenses, be careful of the extreme telephoto settings on your lens, and if you can afford to, back off the tele a bit.
10. Longer focal length. While the above is often true, a longer focal length will require less post-process enlarging resulting in a sharper image. I really noticed the difference when I upgraded my 450mm lens (on my camera body) to a 600mm.
11. Greater mega-pixels. It also stands to reason that the greater the mega-pixels your image has, the better it will hold together when you enlarge it afterwards. A 3.0 mega-pixel image equals film quality an 8x10 print - as long as you don't crop, re-frame and enlarge.
12 Increase contrast. I often increase the contrast in my digital images just as I did in my film darkroom. Unfortunately, if there are any white areas in the image, the contrast increase has to be minimal.
13. HDR To solve the problem above for scenic photography, HDR (the digital melding of multiple exposed images) can be used. Unfortunately, up to seven images of different exposures are required, and this would be rare in bird photography. Stationary herons and owls my be possible.
14. RAW/ NEF. Just as a higher mega-pixel image contains more pixels to enable your image to be enlarged, the RAW/ NEF format increases your image data substantially. In addition to having the ability to increase the size of a small section of the image, there is also more data available to tweak image sharpness by playing with the fuller dynamic range of the image.
15. Lens quality. Brand name lenses (Nikon, Canon, Pentax etc.) will often give you very sharp images, be careful. Some brand name lenses are designed for the mass amateur market, and are not always as sharp as one would wish for. Research on the net as much about the image sharpness quality of the lens you are considering before you buy. Check the lens reviews. You will also find that there are absolutely sharp lenses made by Tamron and Sigma that measure up to or even surpass the brand names.
16. Related to lens quality is the multi-coating of your lens. The more coatings to reduce glare and other factors the better.
17. True macro lenses are sharper and can enlarge more than the close-focus feature found on many zoom lenses. If you can enlarge to a 1:1 or 1:2 ratio, you have a macro lens. If the ratio is 1:4 you have a close-focus lens.
18. If you are using close-up diopter lenses (screwed onto the front of your lens) to get macro for flowers, insects etc. the two element lenses by Nikon (52mm - 4T, 62mm - 6T) are the absolute sharpest as they each contain an extra piece of glass to correct distortion. Unfortunately Nikon realized that buyers were buying their diopter lenses instead of their more expensive macro lenses and discontinued selling them. Check out eBay for the Nikon 4T and 6T. Expect o pay $150.
19. Daylight flash will increase image sharpness but must be used with discretion. Do NOT use with owls in low light!.
20 Get close. The farther your bird is, the more it will have to be optically and digitally enlarged to get a decent framing. Don't be shy of using camo wear or Duk-o-flage camo cover. I have also been told not to wear red or white near birds.
NEW
21 Focus point. For all subjects except macro, the focus point is 1/3 of the way into your subject. For most birds, if you focus on the eyes or beak, the rest of the head and body should be in sharp focus at an aperture of f/5.6 or greater. However, if your subject is a crane or heron with a longer bill, you might have to focus 1/3 into the bill and increase your aperture to f/6.8 or f8. Otherwise the tip of the bill may be soft.
If you are using an f/2.8 lens at f/2.8 larger birds with long beaks may pose a depth-of-field focus problem. I have an f/1.8 lens which has never been used at f/1.8 for that reason.
For macro (flowers, insects etc.) the critical focus point is 1/2 not 1/3 of the way into your subject, and your aperture will be f/22 or f/32.
22. Angle to the subject. To achieve maximum sharpness throughout your image, keep in mind that your focus plane should be perpendicular to your lens. As longer bodies, bills, branches etc angle towards you, closer sections of them may be out-of-focus.
This should be a start. I have no doubt forgotten a few other tips so don't hesitate to add to this thread.
Ken Pugh (Chilliwack)
1. Tripod. There is no factor greater to achieving a sharp image in MOST situations than the use of a photographer friendly tripod. That means a tripod that has enough key features that makes it easy to use - ball head, reasonable weight, flexible legs, height etc. There are many instances where a tripod can not be used in bird photography, but whenever it can, the tripod often increases your ability to create a sharper image without resorting to flash or a high ISO.
2. Remote or electronic shutter. When my bird is not moving, I almost always use an electronic shutter as i am not comfortable with my hands touching the camera body when the image is being taken. I have noticed the difference.
3. Self-timer/ Mirror lock-up. If you don't have a remote or electronic shutter release, a self timer may do the trick. Set it to a two sec release and hope for the best. If your mirror does not lock-up when you use the self timer (You can tell by looking through your viewfinder during the process - the finder will go black), the mirror lock-up feature on your camera will do the trick.
4. Low ISO. Whenever you have to increase the ISO noise increases resulting in degraded image sharpness. Just as Kodachrome 25 was a best film for image sharpness, an ISO of 100 will result in the lowest noise level in your image. Not always possible with bird photography, especially if one chooses to hand hold, but the results speak for itself.
The Ring-necked Duck at Salish Park below was photographed at ISO 280. Not the lowest ISO but the best I could set given the light conditions at the time.
5, High shutter speed. The faster the shutter speed, the sharper your image will be. On a sunny day, I try for f/1000 or higher. Using a car blind, I try for 1/2000 or higher. Straight hand holding, I aim for 1/2000 - 1/4000.
6. Sunlight. In order to set your camera to a low ISO you need enough light to make that those settings possible. The lower the light due to time of day or cloud cover will adversely affect the sharpness of your photo.
7. Depth-of-field. DOF is the depth of clear focus in your image. It is determined entirely by your aperture setting. While f/2.8 lenses will enable you to shoot in lower light, an aperture of f/2.8 may result in some areas of your image being blurred. As you move towards f/22, your DOF or area of sharpness increases.
As an example, I photographed this turtle in Sardis Park yesterday at an aperture of f/5.6. Notice how out-of-focus the hind leg is.
The image below was taken at f/11. Notice the results.
8. Sharpest Aperture. All lenses vary in sharpness depending upon the aperture used. The sharpest aperture tends not to be f/22 or f.2.8 but f/8-f/11.
9. Sharpest focal length. Similar to the above, many lenses go 'soft' at their extreme focal lengths. In photography, the axiom "You get what you pay for" is often true. Those $10,000 lenses have good glass and get great results. For those of use who can not afford the top dollar lenses, be careful of the extreme telephoto settings on your lens, and if you can afford to, back off the tele a bit.
10. Longer focal length. While the above is often true, a longer focal length will require less post-process enlarging resulting in a sharper image. I really noticed the difference when I upgraded my 450mm lens (on my camera body) to a 600mm.
11. Greater mega-pixels. It also stands to reason that the greater the mega-pixels your image has, the better it will hold together when you enlarge it afterwards. A 3.0 mega-pixel image equals film quality an 8x10 print - as long as you don't crop, re-frame and enlarge.
12 Increase contrast. I often increase the contrast in my digital images just as I did in my film darkroom. Unfortunately, if there are any white areas in the image, the contrast increase has to be minimal.
13. HDR To solve the problem above for scenic photography, HDR (the digital melding of multiple exposed images) can be used. Unfortunately, up to seven images of different exposures are required, and this would be rare in bird photography. Stationary herons and owls my be possible.
14. RAW/ NEF. Just as a higher mega-pixel image contains more pixels to enable your image to be enlarged, the RAW/ NEF format increases your image data substantially. In addition to having the ability to increase the size of a small section of the image, there is also more data available to tweak image sharpness by playing with the fuller dynamic range of the image.
15. Lens quality. Brand name lenses (Nikon, Canon, Pentax etc.) will often give you very sharp images, be careful. Some brand name lenses are designed for the mass amateur market, and are not always as sharp as one would wish for. Research on the net as much about the image sharpness quality of the lens you are considering before you buy. Check the lens reviews. You will also find that there are absolutely sharp lenses made by Tamron and Sigma that measure up to or even surpass the brand names.
16. Related to lens quality is the multi-coating of your lens. The more coatings to reduce glare and other factors the better.
17. True macro lenses are sharper and can enlarge more than the close-focus feature found on many zoom lenses. If you can enlarge to a 1:1 or 1:2 ratio, you have a macro lens. If the ratio is 1:4 you have a close-focus lens.
18. If you are using close-up diopter lenses (screwed onto the front of your lens) to get macro for flowers, insects etc. the two element lenses by Nikon (52mm - 4T, 62mm - 6T) are the absolute sharpest as they each contain an extra piece of glass to correct distortion. Unfortunately Nikon realized that buyers were buying their diopter lenses instead of their more expensive macro lenses and discontinued selling them. Check out eBay for the Nikon 4T and 6T. Expect o pay $150.
19. Daylight flash will increase image sharpness but must be used with discretion. Do NOT use with owls in low light!.
20 Get close. The farther your bird is, the more it will have to be optically and digitally enlarged to get a decent framing. Don't be shy of using camo wear or Duk-o-flage camo cover. I have also been told not to wear red or white near birds.
NEW
21 Focus point. For all subjects except macro, the focus point is 1/3 of the way into your subject. For most birds, if you focus on the eyes or beak, the rest of the head and body should be in sharp focus at an aperture of f/5.6 or greater. However, if your subject is a crane or heron with a longer bill, you might have to focus 1/3 into the bill and increase your aperture to f/6.8 or f8. Otherwise the tip of the bill may be soft.
If you are using an f/2.8 lens at f/2.8 larger birds with long beaks may pose a depth-of-field focus problem. I have an f/1.8 lens which has never been used at f/1.8 for that reason.
For macro (flowers, insects etc.) the critical focus point is 1/2 not 1/3 of the way into your subject, and your aperture will be f/22 or f/32.
22. Angle to the subject. To achieve maximum sharpness throughout your image, keep in mind that your focus plane should be perpendicular to your lens. As longer bodies, bills, branches etc angle towards you, closer sections of them may be out-of-focus.
This should be a start. I have no doubt forgotten a few other tips so don't hesitate to add to this thread.
Ken Pugh (Chilliwack)


