
Post by kenpossum on Jan 29, 2011 9:09:35 GMT -8
Timing is everything. Well ... not really everything as there is also focusing, exposure, preparedness etc, but timing is still a big one when it comes to bird photography. How do we capture those special images that show action or unusual behavior. I do it this way, but please ... it is not the only way.
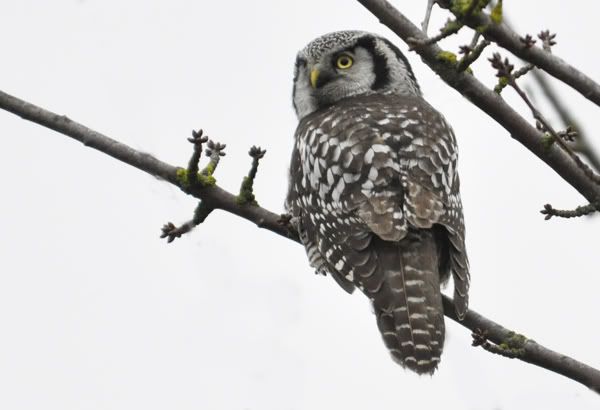
The first image I took of the Northern Hawk Owl at Reifel this week is below. It illustrates all the identifying features. I love taking these shots, but there is more.
I have my tripod set up, and this first initial shot is probably at a high ISO (ie 1000+_ as I am worried that he will take flight, and I would be tasked to freeze action as he is airborne. If that seems unlikely for a minute or two, I quickly drop the ISO down to 400 to 250. I reset my exposure (I am almost always on manual) to a slower shutter speed to reduce digital noise. To take the Saw-whet owl I recently posted, my shutter speed dropped down to 1/13 sec. Obviously, this can not be a hand-held shot, but as I have previously stated, using a tripod expands your camera setting options.
If the bird is in branches, I set my focusing options to the narrowest spot focus my camera offers. Otherwise, it will try to focus on the branches rather than the bird behind them.
When I have the crystal clear shot, I then bump the ISO up again, usually to about 320 or higher and wait for my second shooting objective - behavior. I set my framing to cover the bird, and if necessary reduce my focal length from 400 to 300 to give the bird a little space. I have bumped the ISO up to give me a faster shutter speed for when it moves about (but not takes fight).
I have a remote shutter release attached to my camera and in all of these shots, my fingers are not touching my camera. I want absolute sharpness, and I have found through experience that my sharpness decreases when I am touching the camera when I shoot. If the bird has a set pose you want, your self timer set at 2 sec may work, but only in a very limited way. If the bird does something quick, and very briefly, the self timer idea is not a good choice. With the camera set to shoot, and my finger on the remote timer, I can move my eyes away from the eyepiece if needed, and watch an expanded area around the bird. This helps of other birds approach allowing me to get ready for interaction.
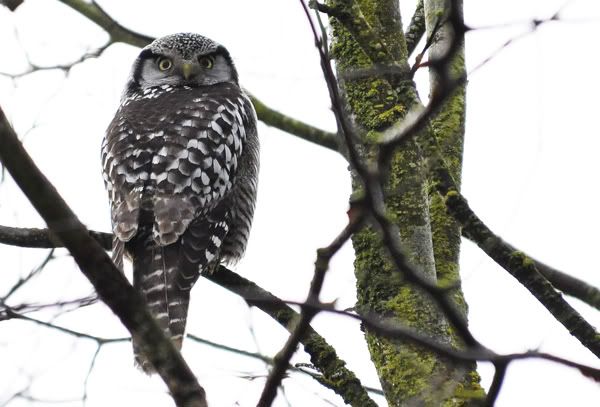
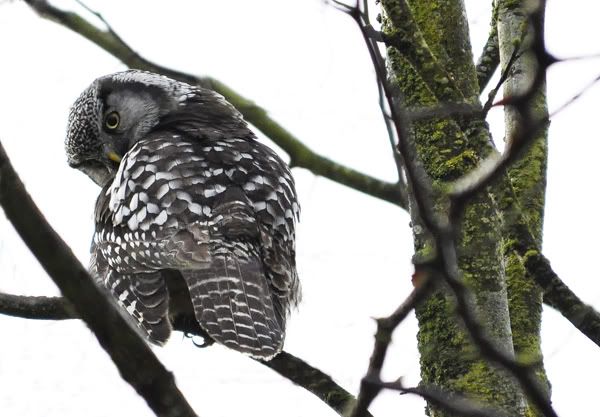
Without touching the camera, and my eyes away from the eyepiece, I captured the two images below - Looking directly at me, and giving me a shy look as it preened itself for its portrait. Both images are very sharp with reduced noise.
When I get a sense that the bird is about to take flight, I bump up the ISO until I can shoot at 1/1000 sec or faster, and I might reduce the focal length to give it more space in the frame. I then focus not on the bird, but on whatever it is sitting on or is the same distance away. If I focus on the bird, I often would capture whatever is behind the bird and that image would be out of focus. I increase my depth of field (area of sharp focus) by opening my aperture from f/5.6 to f/8/.
Finally, I widen the spot focus to better capture the bird in flight. My camera has a 3D predicting focus mode that will calculate the speed of the bird and set the focus to where the bird will be by the time the shutter opens. Sweet, but it doesn't work with the telephoto lens I am using.
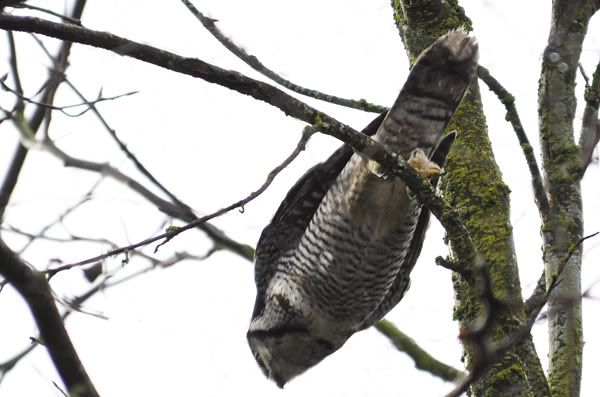
I have a lot of taking off captures of the Northern Hawk Owl using this process, but the image below is different from all the rest I have.
I use this technique very often, and another recent example is the Wood Duck image I posted in the Photo Gallery section. I would be very interested in your comments and any other suggestions you might have. Ken Pugh (Chilliwack)
The first image I took of the Northern Hawk Owl at Reifel this week is below. It illustrates all the identifying features. I love taking these shots, but there is more.
I have my tripod set up, and this first initial shot is probably at a high ISO (ie 1000+_ as I am worried that he will take flight, and I would be tasked to freeze action as he is airborne. If that seems unlikely for a minute or two, I quickly drop the ISO down to 400 to 250. I reset my exposure (I am almost always on manual) to a slower shutter speed to reduce digital noise. To take the Saw-whet owl I recently posted, my shutter speed dropped down to 1/13 sec. Obviously, this can not be a hand-held shot, but as I have previously stated, using a tripod expands your camera setting options.
If the bird is in branches, I set my focusing options to the narrowest spot focus my camera offers. Otherwise, it will try to focus on the branches rather than the bird behind them.
When I have the crystal clear shot, I then bump the ISO up again, usually to about 320 or higher and wait for my second shooting objective - behavior. I set my framing to cover the bird, and if necessary reduce my focal length from 400 to 300 to give the bird a little space. I have bumped the ISO up to give me a faster shutter speed for when it moves about (but not takes fight).
I have a remote shutter release attached to my camera and in all of these shots, my fingers are not touching my camera. I want absolute sharpness, and I have found through experience that my sharpness decreases when I am touching the camera when I shoot. If the bird has a set pose you want, your self timer set at 2 sec may work, but only in a very limited way. If the bird does something quick, and very briefly, the self timer idea is not a good choice. With the camera set to shoot, and my finger on the remote timer, I can move my eyes away from the eyepiece if needed, and watch an expanded area around the bird. This helps of other birds approach allowing me to get ready for interaction.
Without touching the camera, and my eyes away from the eyepiece, I captured the two images below - Looking directly at me, and giving me a shy look as it preened itself for its portrait. Both images are very sharp with reduced noise.
When I get a sense that the bird is about to take flight, I bump up the ISO until I can shoot at 1/1000 sec or faster, and I might reduce the focal length to give it more space in the frame. I then focus not on the bird, but on whatever it is sitting on or is the same distance away. If I focus on the bird, I often would capture whatever is behind the bird and that image would be out of focus. I increase my depth of field (area of sharp focus) by opening my aperture from f/5.6 to f/8/.
Finally, I widen the spot focus to better capture the bird in flight. My camera has a 3D predicting focus mode that will calculate the speed of the bird and set the focus to where the bird will be by the time the shutter opens. Sweet, but it doesn't work with the telephoto lens I am using.
I have a lot of taking off captures of the Northern Hawk Owl using this process, but the image below is different from all the rest I have.
I use this technique very often, and another recent example is the Wood Duck image I posted in the Photo Gallery section. I would be very interested in your comments and any other suggestions you might have. Ken Pugh (Chilliwack)