|
|
Post by Gord on Dec 5, 2010 23:49:55 GMT -8
Time for bed, but I really like what Chris said about a photo he might not have liked how it turned out.
"A great excuse to go back."
That's golden and a great mentality to have on a hobby (birding and photography included) that is peaceful, enjoyable and healthy. Both of those hobbies combined have certainly eased the stress of life for me and Im very thankful for them.
|
|
|
|
Post by kenpossum on Dec 6, 2010 9:33:48 GMT -8
Thanks Chris Anytime you are heading back to the Rockies, contact me. I wrote a set of guidebooks for all the parks that describes all the best locations for scenics, flowers and animals, recommended compositions, exposures, time of day etc. Unfortunately, little on birds.
The challenge of bird photography is what interests me. I still love scenics, animals and flowers, but going out and finding a bird gets my 'mojo' going. Thank you, thank you to all of you on here that post your images, locations, identifications, techniques etc. You don't know (or maybe you do) how appreciative we 'newbies' are to you! This is a fantastic group, and I am awed by the help and encouragement that all of you so freely give. Love to meet you all in the field, or maybe a get together coffee sometime.
|
|
|
|
Post by kenpossum on Dec 6, 2010 9:58:44 GMT -8
My challenge. When I first started my bird photography journey last July, I needed some sort of structure. I found it in the checklist of Fraser Valley birds produced by Gord. It was great to check off each species as I captured each bird photographically. It didn't take long to have multiple images of many species, and soon it became apparent that my checklist could be expanded. I retyped the list onto a grid and expanded the check area. After a couple of rewrites as my challenges expanded, I have the following.
Species / R, H. D, J, B, F. A / Location
R = A record shot. The bird too far away, not as sharp as I would like, foilage in the way etc. Room to improve, and repalce this image asap. H = Habitat. The bird in its' natural surroundings. D= Documentary - the kind of image you would find in a bird identification guide. Everything must be sharp as a tack. J = Juvenile (I can't wait for spring!) B = Behavior Eating, interactions, etc. F = In flight A = Artistic ie close-ups of feather patterns, silhouettes, etc.
Gord suggested this could be expanded to M and F for males and females.
This is just a suggestion, but my checklist gives me more incentive to get out and do more with the common birds. I have great shots of the American Coot but now I need one that has it in flight, unusual behavior, young, interesting behaviors. "Get out there Pugh!"
Suggestions?
|
|
|
|
Post by kenpossum on Dec 6, 2010 17:56:45 GMT -8
Ok - Time to think, and I will expand my checklist to include M, F, and P (for male/female pairs). When I get it done, I will be pleased to make a blank of the master to share with anyone wanting a copy. My original is in WordPerfect but I can make an rtf. How to send it to you is another matter as I am computer stupid (as Gord can surely attest). Ken Pugh
|
|
|
|
Post by Gord on Dec 6, 2010 22:14:36 GMT -8
Ken, no worries at all! What poses a bit of a problem can be helped out by someone here.
I like the way of catagorizing photos. Mine are a bit of a disaster in terms of them being organized.
|
|
|
|
Post by Chris on Dec 6, 2010 22:46:20 GMT -8
Ken, I appreciate the offer regarding the guidebooks for the Rockies. Who knows I might be out there again this summer.
Your information pertaining to the checklist is quite interesting. Myself, I am in the same position as Gord is where my photos aren't organized at all. However, during the summer I tried to arrange a "Field guide" of Birds I have seen. The purpose of this was to get my best picture of a particular bird and put it into the folder. Consequently, I got four species done. I will probably work on it during the break between semesters. Hopefully I get more than four done!
I can't add anything to what you have illustrated regarding you checklist. It is very in depth and certainly adds to the enjoyment and excitement of bird watching. If I do think of something I will definitely pass it along.
|
|
|
|
Post by kenpossum on Dec 7, 2010 8:50:35 GMT -8
Thanks Chris Gord gave me some excellent advice. Try to keep up-to-date with your culling photos, identifying, organizing etc, because if you get behind, it is very difficult to keep up. My main problem was not planning for expansion on my web site. As I acquired more photos, I needed to add more albums, create new catagories, and shuffle images from one album to another. Just getting on top of it now, but it was a mess for weeks. My apologies for those who found geese and the ducks album!
|
|
|
|
Post by kenpossum on Dec 13, 2010 21:51:18 GMT -8
test  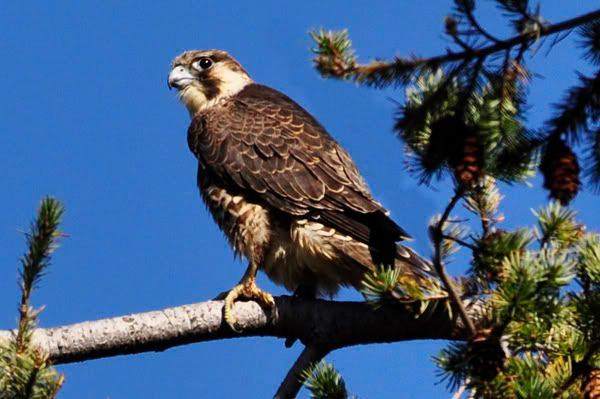 |
|
|
|
Post by Gord on Dec 13, 2010 21:52:08 GMT -8
Well done Ken!! Fantastic photos as well.
|
|
|
|
Post by Dave on Dec 13, 2010 22:25:01 GMT -8
Great stuff, Ken! Keep it coming!
|
|
|
|
Post by kenpossum on Dec 13, 2010 22:38:03 GMT -8
Thanks to Gord for working me through the uploading photos on here! The image of the Peregrine Falcon was taken at Reifel Sanctuary with a 450mm lens. The falcon was a medium distance away, and I wanted it to be sharp. Although my lens has two image stabilization features, I prefer a tripod, even though the light was good. There are many with a steady hand and IS who can manage to take a very sharp image but I still prefer the tripod fot the other points I will be discussing later. I am at the full limit of my lens, and I knew I would be reframing the image and using the digital zoom in Photoshop to get the final framing I want. Sharpness is key, and I try to get every feather as clear and sharp as possible. Try this experiment. Extend your arm out from your body and watch the motion of your fingers compared to the movement of your arm close to your body. Your armpit represents a 50mm focal length, and your fingers 200mm. For a few seconds, or even a minute or two, your fingers may be still. Keep doing that for 15 minutes and watch the movement at your fingers. What a tripod does is keeps those fingers still, no matter how long they are extended (or your lens at its longest focal length). A tripod not only increases your sharpness by reducing lens movement at longer focal lengths but allows you to take as much time as you require to wait for the decisive moment when there is interesting behavior to capture. 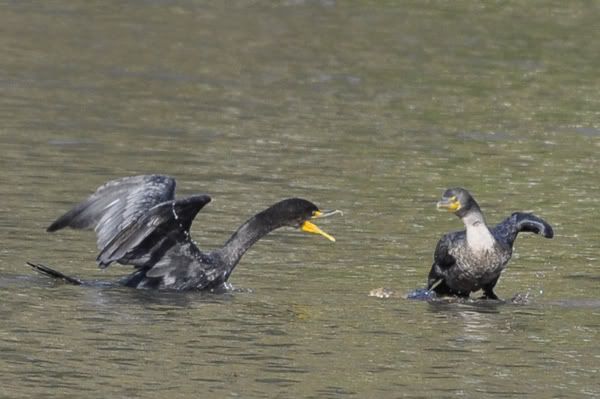 I waited at least 30 min for this behavior action to take place, and my arms, fingers and lens were as steady as a rock. If I had used the IS feature on my lens and hand-held, I wouldn't have lasted more than 5 min tops. (Just a guess as I use a tripod 100% of the time) By the time I would had raised the lens, framed, focused and took the shot in IS mode, the action would have long passed. That being said, I have not been taking photos from a boat as many of you do, where a tripod would be impractical. |
|
|
|
Post by kenpossum on Dec 14, 2010 6:37:24 GMT -8
The image with this post was taken early in the day when the light was weak. I had to shoot at f/5.6 at 1/30sec. f/5.6 in this shot gives enough depth 0f field to capture all of the Dark-eyed junco, but the 1/30 sec was a hope and a prayor. Fortunately, the junco took a moment to be still, and fortunately for me, I was using a tripod. 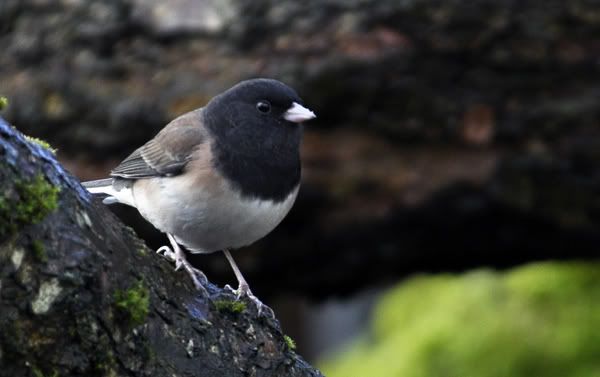 Hand-holding and using the IS feature on my lens may have worked as well, and perhaps flash. Flash would have been a one-shot option, and the iS may have bumped my speed up to 1/125 sec. Using a tripod gives you the full range of your camera settings. IS can increase your shutter speed 2-3 stops but beyond that, you are sunk. For scenics (view my web page at http://www.kenpugh.ca) I an usually shooting at 1/22 and at speeds less than 1/30 sec. A tripod makes those settings possible. I control the image rather than the camera settings telling me what I can or can not do. Hand-holding at 1/30sec. without IS is not an option for me. There is a place for handholding with IS and I am glad I have that feature on my lenses. Later. |
|
|
|
Post by kenpossum on Dec 14, 2010 8:27:28 GMT -8
The image of the Double-crested Cormarants above illustrates yet another reason why I religiously use a tripod. I had focused my lens on the right cormorant and over 30 minutes had taken a number of images. Looking through my SLR, I could only see the one bird. However, I also use an electronic shutter release with my tripod (more on that later), which allowed me to take my face and eye away from of my lens and look at the larger field of view. I could easily see the cormorant on the left approching the one on the right, something which I would not have been aware of, if I had to keep my eye to the lens. I watched the left cormorant approach and was prepared for the confrontation about to happen.
In summary, using a tripod combined with an electronic shutter release enabled me to see interaction that was about to happen rather than be surprised when it occurred. I did not loose any time repositioning my lens to shooting position, then frame, focus and shoot. All of this has nothing to do with sharpness or the IS option.
|
|
|
|
Post by oldfulica on Dec 14, 2010 15:05:33 GMT -8
Good advice Ken. I think I have given my camera enough learning curve time and now it is time to get the tripod out.
|
|
|
|
Post by kenpossum on Dec 16, 2010 15:05:56 GMT -8
When I am capturing a bird, my primary concern is sharpness, so as I do with all animals I focus on the eyes. They must be sharp, and if at all possible have a catch-light. The placement of the bird in relation to the sum is important as the sun has to illuminate the eyes. If the sun is behind the bird, a silhouette may result. Second, I want as many feathers crystal sharp as well. This may require a smaller aperture to achieve more depth of field. 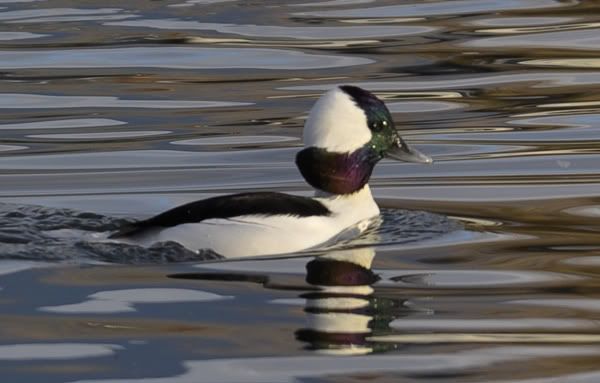 Finally, as illustrated in this image of a Bufflehead at Sardis Park, I try to have the subject against a contrasting or colourful background. I love working at Sardis Park as there are reflections everywhere. |
|


